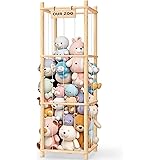
Woodure Stuffed Animal Storage & Organizer, Wooden Cute Zoo Toy Holder for Toddler Rooms, Playrooms & Bedrooms
$39.99 (as of June 12, 2026 21:10 GMT +00:00 - More infoProduct prices and availability are accurate as of the date/time indicated and are subject to change. Any price and availability information displayed on [relevant Amazon Site(s), as applicable] at the time of purchase will apply to the purchase of this product.)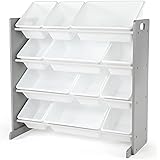
Humble Crew Toy Storage Organizer with 12 Removable Storage Bins for Kids Playroom, 4-Tier Toddler Toy Organization, Grey/White
$41.21 (as of June 12, 2026 21:10 GMT +00:00 - More infoProduct prices and availability are accurate as of the date/time indicated and are subject to change. Any price and availability information displayed on [relevant Amazon Site(s), as applicable] at the time of purchase will apply to the purchase of this product.)
Tagitary Beach Toy Mesh Beach Bag Kids Shell Collecting Bag Beach Sand Toy Seashell Bags Swimming Accessories for Boys and Girls(Only Bags,A Set of 3)
$14.39 (as of June 12, 2026 21:10 GMT +00:00 - More infoProduct prices and availability are accurate as of the date/time indicated and are subject to change. Any price and availability information displayed on [relevant Amazon Site(s), as applicable] at the time of purchase will apply to the purchase of this product.)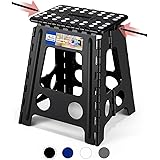
ACKO Folding Step Stool Foldable 16 Inch 400 lbs Capacity, Plastic Stools for Adults and Kids, Collapsible Stools for Kitchen, Stepping Stool with Handle, Black,1 PC
$22.99 (as of June 12, 2026 21:10 GMT +00:00 - More infoProduct prices and availability are accurate as of the date/time indicated and are subject to change. Any price and availability information displayed on [relevant Amazon Site(s), as applicable] at the time of purchase will apply to the purchase of this product.)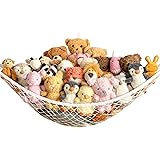
Stuffed Animal Storage Hammock Net Corner - Large Toy Hammock Net for Stuffed Animals Room Decor - Cute Stuff Animal Organizer Holder for Plush Plushie - Kids Baby Nursery Wall Bedroom Home Decor
$5.99 (as of June 12, 2026 21:10 GMT +00:00 - More infoProduct prices and availability are accurate as of the date/time indicated and are subject to change. Any price and availability information displayed on [relevant Amazon Site(s), as applicable] at the time of purchase will apply to the purchase of this product.)Want to make a cute handmade bracelet but don’t have fancy tools or beads?
This step-by-step DIY tutorial will show you how to create stylish string bracelets using only basic materials — threads, scissors, and your own hands.
Perfect for beginners, students, or anyone who loves simple crafts at home.
🌸 Why Choose String Bracelets?
String bracelets are the most beginner-friendly type of handmade jewelry.
They’re lightweight, colorful, and can be made anywhere — no need for special tools or beads.
Just some embroidery floss or cotton thread, and you’re ready to start crafting.
Plus, they make thoughtful gifts. Each color and knot can represent friendship, love, or good wishes.
🧵 What You’ll Need
You probably already have everything at home:
-
Embroidery floss or cotton string (3–6 colors)
-
Scissors
-
Tape or clipboard to secure the top while knotting
Optional (for finishing):
A dab of clear nail polish or glue to seal the knot.
💡 If you want a starter kit:
👉 DIY Friendship Bracelet Making Kit on Amazon
<
✨ How to Make a String Bracelet (Step-by-Step)
Step 1: Cut Your Strings
Pick 3 to 6 colors, each about 70 cm long.
Tie them together with a knot at one end, leaving 5 cm of extra length for tying later.
Step 2: Secure the Top
Stick the knotted end to your table with tape or clip it onto a clipboard.
Keeping it tight helps your knots stay even.
Step 3: Choose a Simple Pattern
You can try one of these easy techniques:
A. Candy Stripe Pattern
-
Arrange strings in color order.
-
Take the leftmost string and make forward knots across all others.
-
Repeat with the next color.
B. Spiral Twist Pattern
-
Use two colors.
-
Make the same half knot repeatedly — the bracelet will start to twist naturally.
C. Braided Style
-
Split your strings into three groups and braid just like hair.
-
This one takes only 5 minutes to complete!
Step 4: Finish It Off
Once your bracelet is long enough, tie a final knot.
Trim the ends evenly.
You can apply a tiny bit of glue or clear nail polish to keep it from unraveling.
<
🌈 Tips for Perfect Results
-
Keep your knot tension consistent — that’s the key to neat lines.
-
Always comb your threads before starting to avoid tangles.
-
Try gradient color combinations for a trendy ombre look.
-
If you’re gifting it, make two matching bracelets (one for each friend).
💡 Design Ideas
-
Use pastel tones for a soft, calm look.
-
Try bright rainbow colors for a playful summer style.
-
Make a simple anklet using the same method — just longer!
-
Combine two finished bracelets by twisting them together for a layered design.
🧘 The Mindful Side of Crafting
Crafting string bracelets isn’t just a creative hobby — it’s also a mindful practice.
Repeating knots helps calm the mind and improve focus.
It’s the perfect offline activity after a busy day or while listening to music.